Get Started
Installation
Blumen supports one of the these JavaScript runtimes: Node.js (20+), Deno (2.2.11+) and Bun.
npm i -g blumenpnpm i -g blumenbun i -g blumendeno install --global --allow-read --allow-env --allow-write --allow-net npm:blumenIPFS provider setup
Initial deployment
The first step is setting up content storage providers to deploy the web application to. The full list is available with detailed instructions on the "IPFS" page. At the moment of writing, Storacha is the only provider that allows uploading web content on a free tier, which is why it is used in this guide.
Generating a key for Storacha requires a CLI tool.
Install it with:
pnpm i -g @storacha/clinpm i -g @storacha/clibun i -g @storacha/cliNext, login to your Storacha account:
storacha login
# ? How do you want to login? Via GitHub
# ? Open the GitHub login URL in your default browser? yes
Storacha uses spaces (similar to buckets). You would need to create one, if you don't have one already:
storacha space create
# ? What would you like to call this space? blumen-docs
# 🔑 You need to save the following secret recovery key somewhere safe! For example write it down on
# a piece of paper and put it inside your favorite book.

# •••• •••••• ••••• ••••• •••••• •••••••• ••••••• ••••••• •••• •••••• •••••• •••• •••••• •••••••
# ••••• •••• ••••••• ••••• •••• ••••• •••••• ••••••• ••••• ••••

# 🔐 Secret recovery key is correct!
# 🏗️ To serve this space we need to set a billing account
# ✨ Billing account is set
# ⛓️ To manage space across devices we need to authorize an account
# ✨ Account is authorized
# 🐔 Space created: did:key:z6Mkw...qAk
Save the recovery key in a safe place.
Once you have a space, you need to select it:
storacha space use <space DID>When both the account and the space are set up, you need to generate a unique private key. It is required to create a delegation proof to be able ot upload files to the space.
storacha key createSave this private key (which starts with Mg..) to an environment variable (BLUMEN_STORACHA_TOKEN) in .env file.
With the key generated, it is now possible to create a delegation proof:
storacha delegation create <did_command_above> --can 'store/add' --can 'upload/add' --can 'space/blob/add' --can 'space/index/add' --base64Save the command output in a BLUMEN_STORACHA_PROOF environment variable.
In the end your .env file should look like this:
BLUMEN_STORACHA_TOKEN=Mg123456789ogR1enjgn123bi1KqzYz123456v123iLJkeiLIO4=
BLUMEN_STORACHA_PROOF=mAYIEAJM...uIXm2rXyL...Zxe4Bh6g2RQZwjDUcw3qrvMNXzu2pg/rdd...IGXkvTsk9jnMGkBKPo...A7rC1u/tWHthsGVm8F6...pYJQABcRIgFFoH6R...8ukdZvYKuk2pthEmuyCVkAmPlC/kT3MM
Blumen is now ready to deploy your app on IPFS.
Read the environment variables from .env file:
source .envAnd run blumen deploy (will deploy dist dir by default):
blumen deploy🟢 Deploying with providers: Storacha
📦 Packing dist (4.43MB)
🟢 Root CID: bafybeig2rerivrgw6y2bbh65hib2fxicmc7te4xygakkln4foocprcppeq
✓ [>>>>>>>>>>>>>>>>>>>>>>>>>>>>>>>>>>>>>>>>>>>>>>>>>>>>] Finished in 12s
✔ Deployed across all providers
Open in a browser:
IPFS: https://bafybeig2rerivrgw6y2bbh65hib2fxicmc7te4xygakkln4foocprcppeq.ipfs.dweb.link
Providers: https://delegated-ipfs.dev/routing/v1/providers/bafybeig2rerivrgw6y2bbh65hib2fxicmc7te4xygakkln4foocprcppeqPin to other providers
Uploading a website to a single IPFS provider doesn't guarantee decentralization or censorship resistance. It is recommended to pin to at least 1-2 more IPFS providers.
Adding more IPFS providers is as easy as adding an API token, for example for Pinata it would be BLUMEN_PINATA_TOKEN.
For a full list of supported IPFS providers, refer to the "IPFS" page.
ENS Updates
Blumen directly integrates with ENS (Ethereum Name Service).
Similarly to how DNS is used for websites to not expose raw IP addresses and be more human-friendly, ENS serves the same purpose for content hashes, for example IPFS CIDs.
Automatic ENS updates are as easy as supplying an extra CLI argument during deploy, and adding a name manager's private key to .env:
DANGER
Using a private key of the ENS name manager account has immediate security risks. Consider Safe MFA setup instead.
BLUMEN_PK=<0xensmanagerprivatekeygoeshere>blumen deploy --ens blumen.stauro.ethUpdating ENS Content-Hash record requires paying a network fee. The fee varies depending on network load.
MFA with Safe
Using a private key of the ENS name manager account imposes significant security risks. In case of environment compromise, an attacker is able to update the ENS name to a malicious version.
One of the unique features that Blumen offers is Safe integration. Instead of EOA managing the ENS name, a multi-signature wallet is put in the front. Such approach adds an extra factor of authorisation before a website update is pushed onchain.
With Safe, ENS update process is split into two stages:
- An update transaction is created from a "proposer". Proposer is a special Ethereum account that does not have access to a Safe wallet but is allowed to propose transactions to a wallet without actually executing them.
- One (or whatever the threshold is) of the Safe owners approves the transaction sent by a proposer and updates an ENS name record.
Head over to the Safe app and create a new wallet, if you don't have a Safe wallet yet.
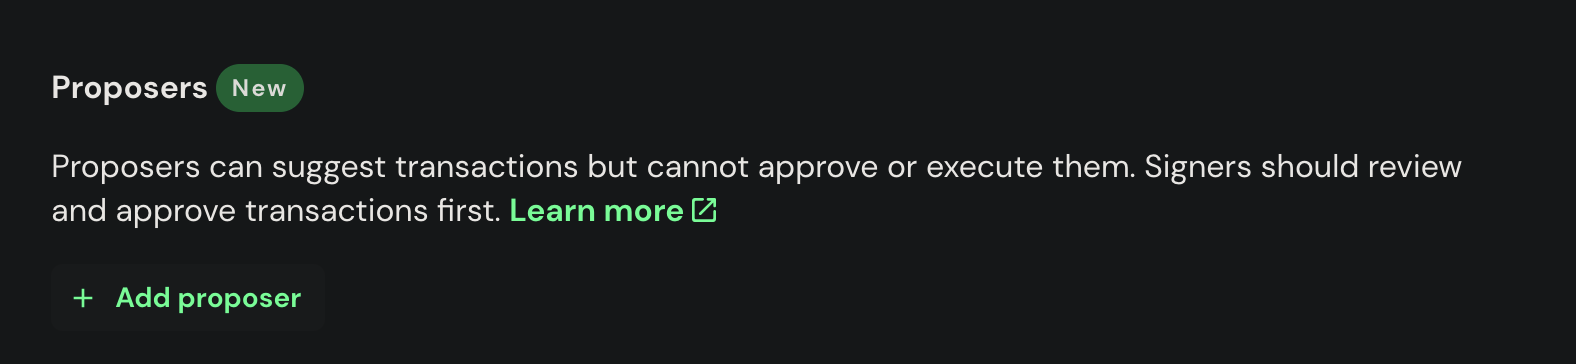
Next, a proposer account is required to be added. A proposer is not allowed to approve transactions but can propose them to the wallet. To add a proposer, go to the Safe app > Settings > Setup. Scroll down to "Proposers" and click "Add Proposer". You can add multiple proposers to your Safe, but only one can be used at a time.
Once the account is added, put it's private key to environment variables:
BLUMEN_PK=0x...With everything set up, a deployment can be triggered.
blumen deploy --ens=blumen.stauro.eth --safe=eth:0x...# 📦 Packing dist (4.43MB)
# 🟢 Root CID: bafybei...lk4
# 🟢 Deploying with providers: Storacha, Filebase
# ✓ [>>>>>>>>>>>>>>>>>>>>>>>>>>>>>>>>>>>>>>>>>>>>>>>>>>>>>>>>>>>>>>] Finished in 5s
# ✔ Deployed across all providers
# Open in a browser:
# IPFS: https://bafybei...lk4.ipfs.dweb.link
# Providers: https://delegated-ipfs.dev/routing/v1/providers/bafybei...lk4
# Validating transaction for wallet <0x...>
# Preparing a transaction for Safe <eth:0x...>
# Signing a Safe transaction
# Proposing a Safe transaction
# Transaction proposed to a Safe wallet.
# Open in a browser: https://app.safe.global/transactions/queue?safe=<0x...>The web app got deployed on IPFS. The last step is approving a transaction proposal to update the ENS name record that points to the version of the app.
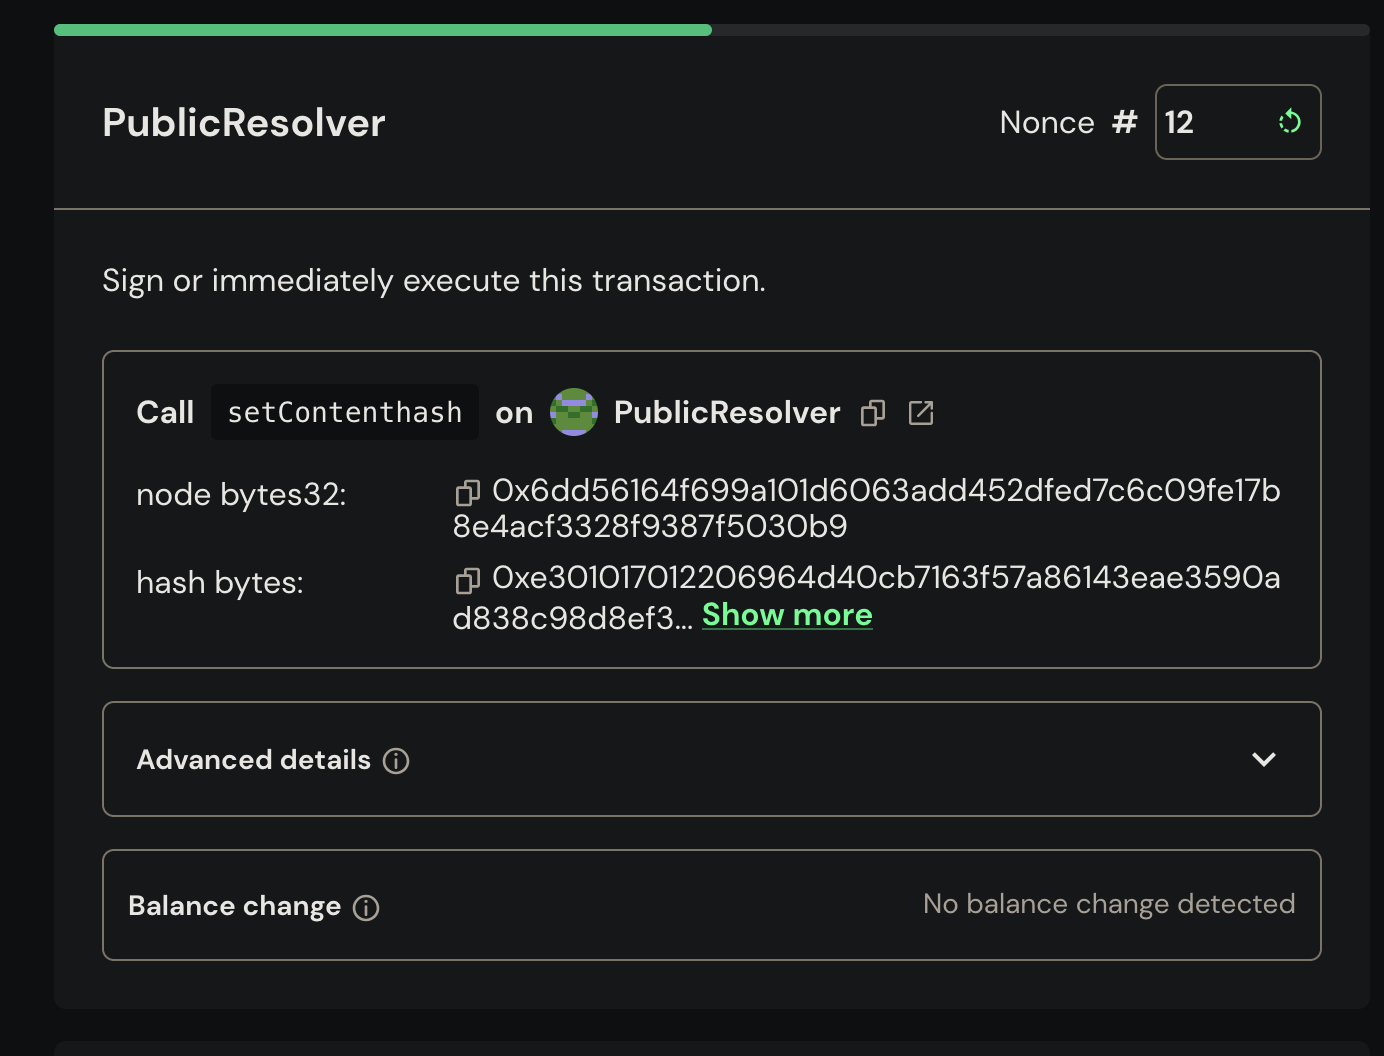
Click on the last link emitted by Blumen deployment logs to take you straight to the transaction queue:

Verify the transaction data and click "Continue" and then "Execute".
Once it finishes getting processed, the ENS Content-Hash record should start pointing to your new deployment. Now the web app should be discoverable through any ENS gateway, for example eth.limo.
Automation with CI/CD
Blumen seamlessly integrates with CI/CD pipelines.
All the previous steps can be automated in one GitHub Actions workflow. The workflow deploys a new version on IPFS every time a commit is pushed to the main branch and automatically proposes a transaction to Safe.
name: Deploy with Blumen
on:
  push:
    branches: main
jobs:
  deploy:
    runs-on: ubuntu-latest
    steps:
      - uses: actions/checkout@v4
      - uses: oven-sh/setup-bun@v2
      - name: Install Blumen
        run: bun i -g [email protected]
      - name: Build website
        run: bun i && bun run build
      - name: Deploy the site
        run: blumen deploy .vitepress/dist --strict --ens ${{ vars.BLUMEN_ENS }} --safe ${{ vars.BLUMEN_SAFE }}
        env:
          BLUMEN_PINATA_TOKEN: ${{ secrets.BLUMEN_PINATA_TOKEN }}
          BLUMEN_STORACHA_PROOF: ${{ secrets.BLUMEN_STORACHA_PROOF }}
          BLUMEN_STORACHA_TOKEN: ${{ secrets.BLUMEN_STORACHA_TOKEN }}
          BLUMEN_LIGHTHOUSE_TOKEN: ${{ secrets.BLUMEN_LIGHTHOUSE_TOKEN }}
          BLUMEN_4EVERLAND_TOKEN: ${{ secrets.BLUMEN_4EVERLAND_TOKEN }}
          BLUMEN_PK: ${{ secrets.BLUMEN_PK }}
The "CI/CD" page describes integrations with other CI/CD providers, such as GitLab Actions.